I have pain in my joints which makes it difficult for me to knit or crochet.
I’m giving knitting a break for now. :(
Check out my new sewing blog at easylearntosew.wordpress.com.
Thanks!!
I have pain in my joints which makes it difficult for me to knit or crochet.
I’m giving knitting a break for now. :(
Check out my new sewing blog at easylearntosew.wordpress.com.
Thanks!!
Gauge 2.5 st to 1 in (brim)
Gauge 3.25 st to 1 in (Chart A cable)
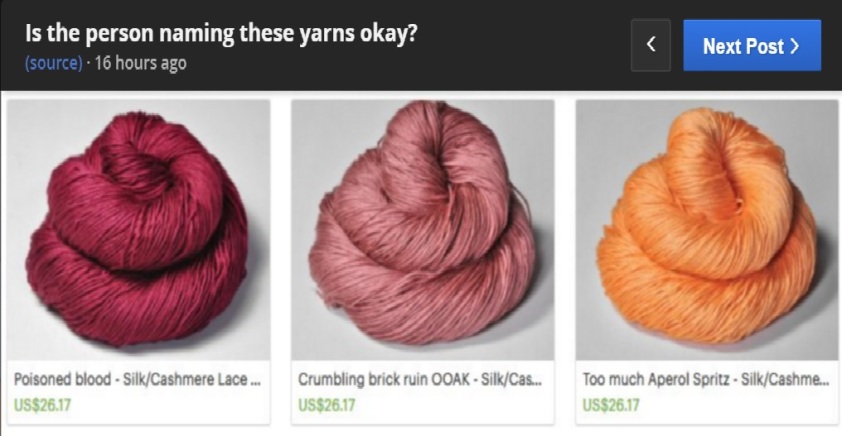
Yarn: Malabrigo Rasta in Soriano and Stitch Red
DPN Size 9
Circumference 22 inches

ORIGINAL:
Brim: k1p1 for 4 in (10cm)
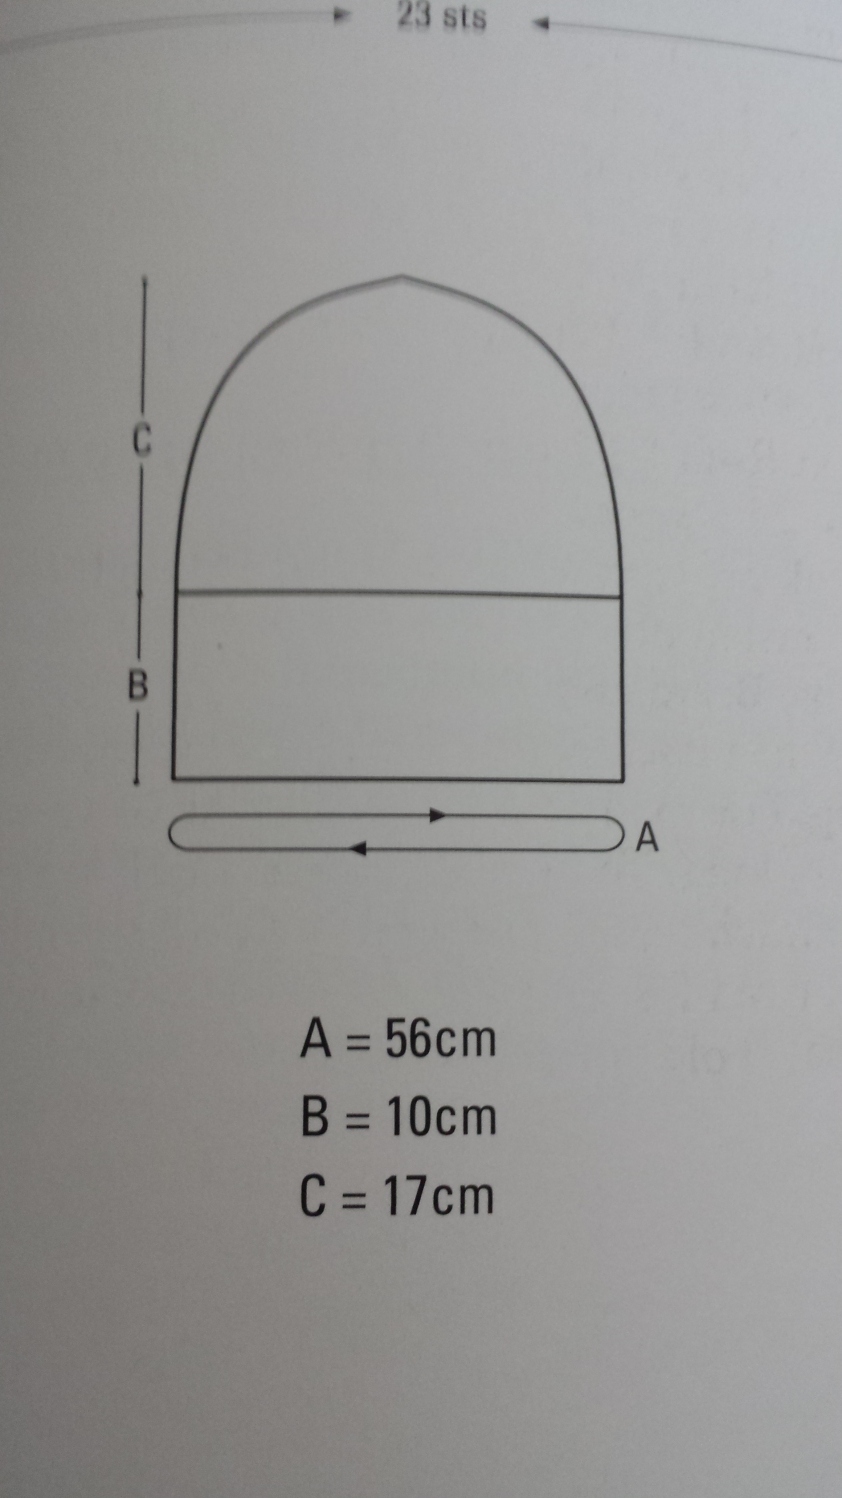
Hat body (pattern part) is 17 cm, which is 7 in
Circumference of Kittiwake pattern is 56 cm, which is 22 in.
MY ADAPTATION:
Brim: k1p1 for 3 in
Hat body 7 in
Circumference 22 in
Book: Aran Knitting, Alice Starmore, Kittiwake Hat, page 133 (charts)
CO 54 st
I used a two color long tail cast on.
I’m not using the red yarn past the cast on.
Chart A = Hat, 23 st wide, 37 st high
Gauge at this pattern is 3.25 st to 1 in
Can make shorter, remember to do a 5 to 1 decrease in center of pattern at top row. This would look best at row 37, 25, 13 and 3.


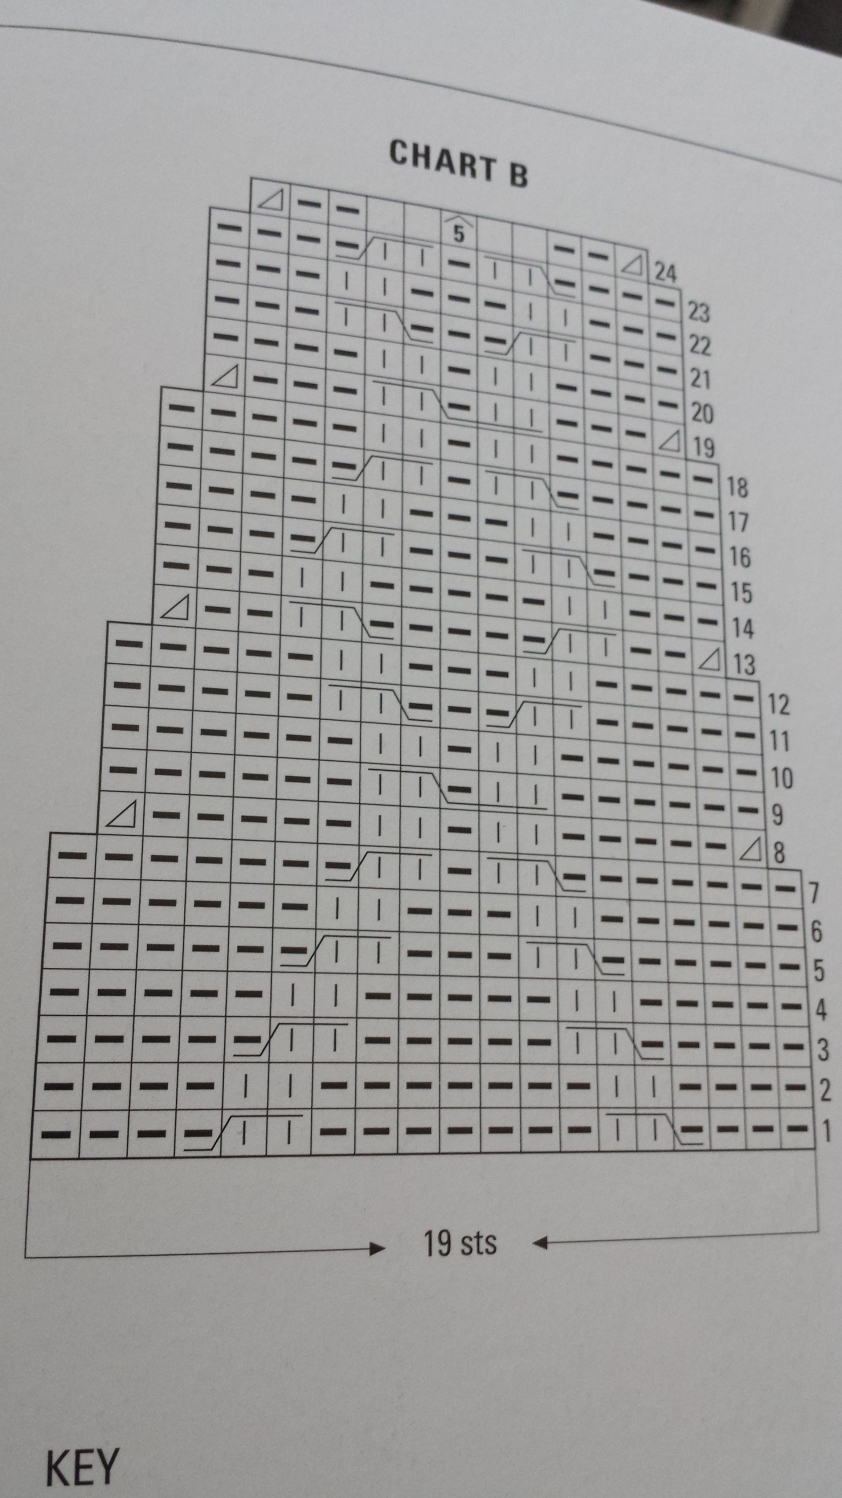
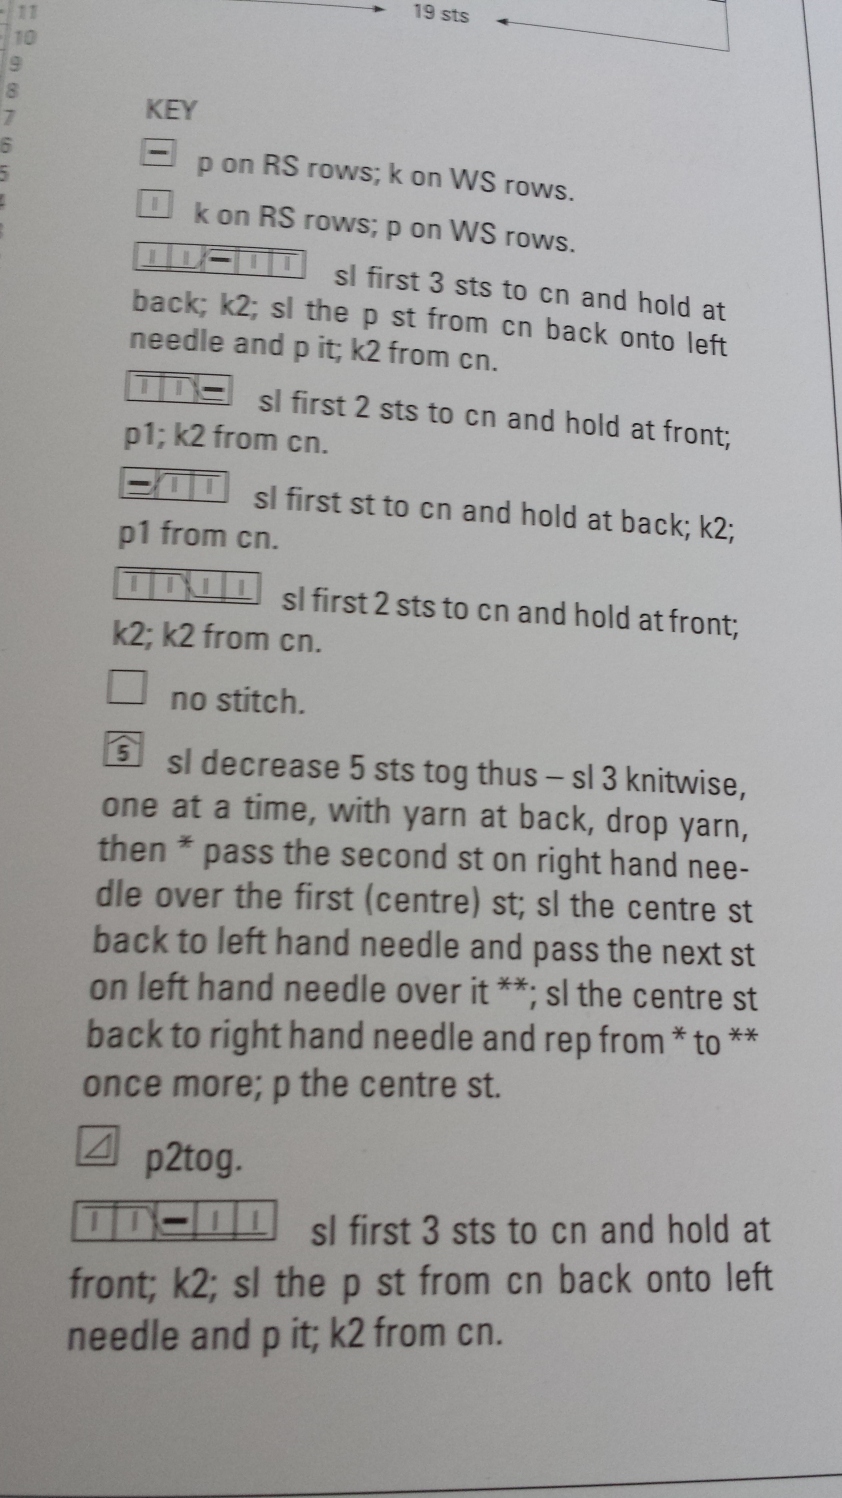
Chart B = Brim decreases, 19 st wide, 24 st high
Decreases are at row 8, 13, 19, and 24. So every 5 rows, two st per repeat disappears. Two repeats, so that is four st. [RECALCULATE] Gauge of 2.5 st to 1 in, that means 1.6 in disappears every five rounds. That actually sounds fine, take a look again when you get there.
After Chart B:
Round 1: p
Round 2: p2tog, p3, p2tog
Round 3: p2tog, p1, p2tog
Break off yarn and put through remaining st on needle. Tighten. Fasten off if you don’t want a pom pom or a tassel.
If you want a pom pom or tassel, refer to the book p. 132.
You’ve heard it here first. My prediction for this year is that the Cubs will finally win the World Series. Anyone willing to take my bet? At what odds? ;)

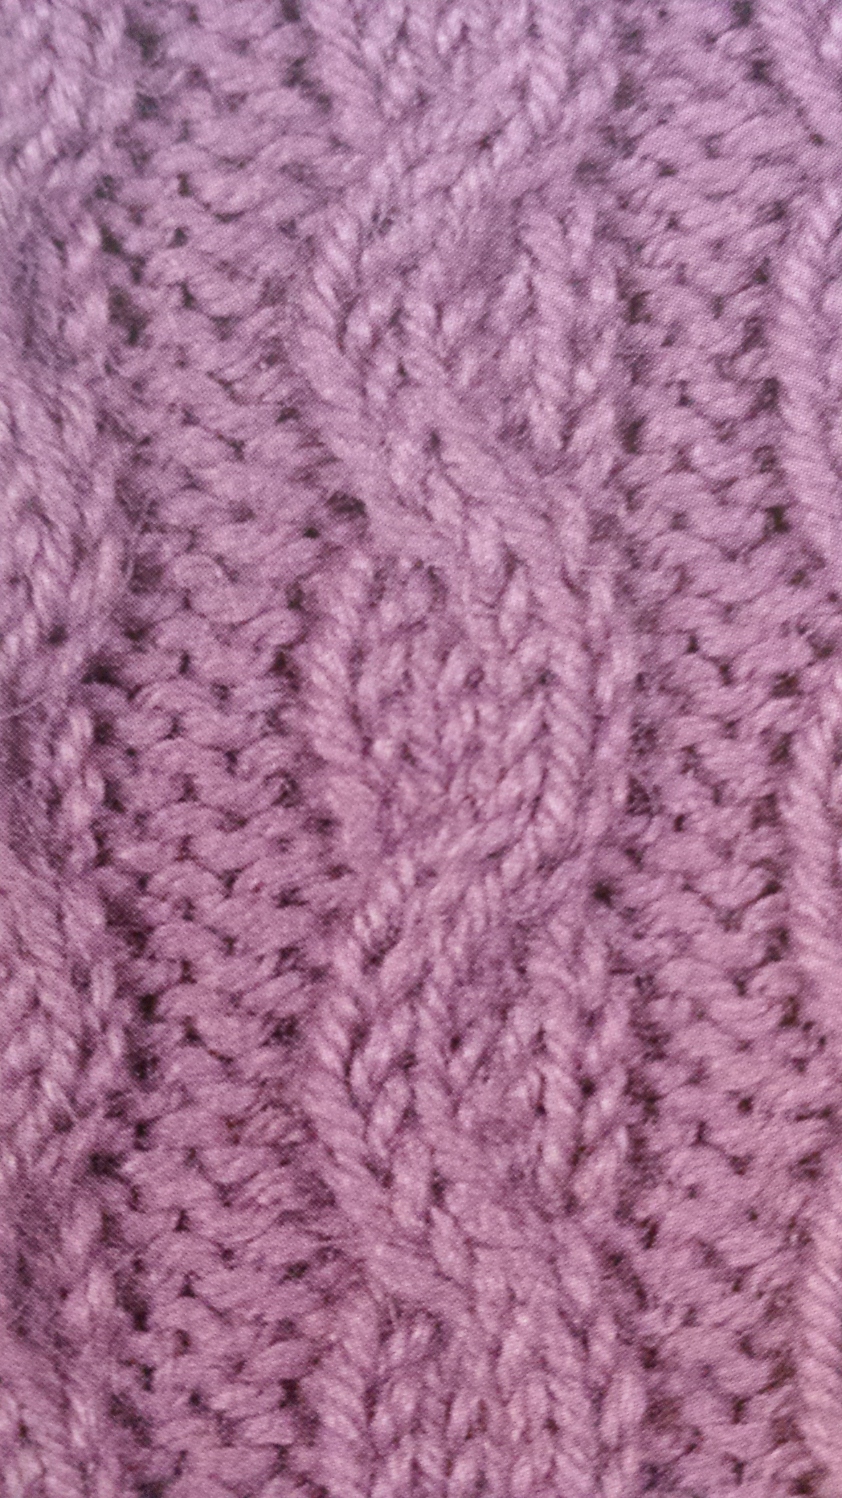
Need to figure out a pattern so I can make this skirt.
It’s so pretty! (Yes, I’m a fuddy duddy at heart).

I’m going to knit it top down.
Waist is in stockinette, looks like a 1.5 in elastic band.
SO: measure waist, do a test swatch and figure out gauge. Multiply gauge by inches waist. CO that many stitches, join. K for 1.5 in, do a p row, k for 1.5 in again. Seal the elastic waistband inside (in circle, sewed to an inch under waist size).
Pattern is a 6CF, with a st or two st in between. In the picture it’s something like 16 6CF 1 st or 2 st repeats. That is done for 4 row repeats, then the increases begin. Each row after that increases by 1 st or 2 st between the 6CF repeats. Skirt ends with about 3 inches of k2p2.
Overall: pretty simple, but absolutely stunning.
Drops Jumper Flat Knitting
Size XL
Finished measurements:
Bust: 41¾’’
Full length: 24¾”
DROPS POINTED NEEDLES size 3 mm / US 2 or 3 – or size needed to get 24 sts x 32 rows in stockinette st = 10 x 10 cm / 4’’ x 4’’. [6 st to 1 in]
DROPS POINTED NEEDLES size 2.5 mm / US 1 – for rib
PATTERN:
See diagram M.1 and M.2. Diagram shows the pattern from RS.
BACK PIECE:
Worked back and forth on needle.
Cast on 142 (includes 1 edge st each side) on needle size 2.5 mm / US 1.
Work rib as follows (first row = RS): 1 edge st, * K3, P4 *, repeat from *-* and finish with 1 edge st.
When rib measures 2 cm / 3/4’’ K 1 row from RS, AT THE SAME TIME dec 12 sts evenly = 130 sts.
Change to needle size 3 mm / US 2or3.
P 1 row from WS and continue in stockinette st with 1 edge st each side.
When piece measures 9 cm / 3½’’ dec 1 st each side, repeat the dec on every 2 cm / 3/4’’ a total of 5 times = 120 sts.
When piece measures 8” inc 1 st each side, repeat the inc on every 1½” a total of 5 times = 130 sts.
When piece measures 16 1/8” bind off 4 sts each side for armhole and bind off for armhole each side on every other row: 4 sts 1 times, 2 sts 6 times and 1 st 1 times = 88 sts. Continue in stockinette st on all sts.
When piece measures 23 5/8” bind off the middle 36 sts for neck and complete each shoulder separately.
Bind off 1 st on neckline on every other row 2 times = 24 sts left on shoulder.
Bind off loosely when piece measures 24¾”.
FRONT PIECE:
Cast on and work like back piece until piece measures 8”.
On next row inc 1 st each side, repeat the inc on every 1½” a total of 5 times = 130 sts. Continue in stockinette st with 1 edge st each until piece measures 14¼”.
Now continue as follows (from RS): 1 edge st, 49 stockinette sts, M.1 (= 30 sts), 49 stockinette sts and 1 edge st.
AT THE SAME TIME when piece measures 16 1/8” bind off for armhole each side as described for back piece.
Continue up to arrow-A in M.1.
On next row from RS bind off for neck as follows: work the first 24 sts of M.1, bind off 2 sts (= mid front) and work the remaining 24 sts of M.1 (work remaining sts in stockinette st as before). Insert a marker in piece, and now complete each side separately.
LEFT FRONT PIECE:
Continue back and forth on needle in stockinette st and M.1 as before – remember to bind off for armhole at the side!
AT THE SAME TIME on next row from mid front dec 1 st for neck. Continue to arrow-B in diagram for M.1. Now continue with 15 sts rib as shown in M.1, work remaining sts in stockinette st as before.
AT THE SAME TIME dec 1 st for neck inside the 15 sts in rib, and repeat the dec on every 4th row 5 times = 39 sts.
Continue until piece measures 5 1/8” from marker (adjust to length of armhole on back piece).
Now bind off 24 sts from shoulder towards neckline = 15 sts left on needle.
Continue back and forth on needle in rib as before on these 15 sts. Bind off loosely with K over K and P over P after approx 3 1/8’’ (measured from shoulder).
RIGHT FRONT PIECE:
Like left front piece but mirrored.
ASSEMBLY:
Sew shoulder seams.
LONG SLEEVES:
Worked back and forth on needle.
LEFT SLEEVE:
Cast on 65 sts on needle size 2.5 mm / US 1 .
Work rib as follows (first row = RS): 1 edge st, * P4, K3 *, repeat from *-* on 21 sts, M.2 (= 18 sts), K3, * P4, K3 *, repeat from *-* on the next 21 sts and 1 edge st.
Continue like this up to Arrow-C in M.2. There are now 73 sts on needle.
Change to needle size 3 mm / US 2or3 and continue as follows (from RS): 1 edge st, 21 stockinette sts, M.2 (= 26 sts), 24 stockinette sts and 1 edge st.
Work 1 vertical repeat of M.2 like this = 65 sts on needle. Insert a marker, and now measure piece from here. Continue in stockinette st with 1 edge st each side.
AT THE SAME TIME when piece measures approx 3/8” from marker inc 1 st each side, repeat the inc on every ½” a total of 18 times = 101 sts.
When piece measures 11¾” from marker (less for the larger sizes because of longer sleeve cap and wider shoulder) bind off for 4 sts each side for sleeve cap and bind off for sleeve cap at the beg of every row: 2 sts 5 times each side and 1 st 5 times each side, then bind off 2 sts each side until piece measures 15¾”, now bind off 4 sts each side 1 time, and bind off remaining sts.
Piece measures a total of approx 23¼”.
RIGHT SLEEVE:
Cast on 65 sts on needle size 2.5 mm / US 1.
Work rib as follows (first row = RS): 1 edge st, * K3, P4 *, repeat from *-* on 21 sts, K3, M.2 (= 18 sts), * K3, P4 *, repeat from *-* on the next 21 sts and 1 edge st. Continue like this up to Arrow-C in M.2.
There are now 73 sts on needle. Change to needle size 3 mm / US 2or3 and continue as follows (from RS): 1 edge st, 24 stockinette sts, M.2 (= 26 sts), 21 stockinette sts and 1 edge st.
Work 1 vertical repeat of M.2 like this = 65 sts on needle. Insert a marker, and now measure piece from here. Continue as described for Left Sleeve.
ASSEMBLY:
Sew shoulder seams. Set in sleeves. Sew sleeve and side seams inside 1 edge st. Sew rib on neck tog mid back and sew to back piece.

Materials: DROPS ALPACA from Garnstudio
Color no 618, light beige:
3/4 sleeves: 250-300-350-350-400-450 g
Long sleeves:300-350-400-400-450-500 g
DROPS POINTED NEEDLES size 3 mm / US 2or3 – or size needed to get 24 sts x 32 rows in stockinette st = 10 x 10 cm / 4’’ x 4’’. [6 st to 1 in]
DROPS POINTED NEEDLES size 2.5 mm / US 1 – for rib
PATTERN:
See diagram M.1 and M.2. Diagram shows the pattern from RS.
BACK PIECE:
Worked back and forth on needle. Cast on 107-121-135-142-163-177 sts (includes 1 edge st each side) on needle size 2.5 mm / US 1 with Alpaca. Work rib as follows (first row = RS): 1 edge st, * K3, P4 *, repeat from *-* and finish with 1 edge st. When rib measures 2 cm / 3/4’’ K 1 row from RS, AT THE SAME TIME dec 9-13-17-12-19-19 sts evenly = 98-108-118-130-144-158 sts. Change to needle size 3 mm / US 2or3.
P 1 row from WS and continue in stockinette st with 1 edge st each side. When piece measures 9 cm / 3½’’ dec 1 st each side, repeat the dec on every 2 cm / 3/4’’ a total of 5 times = 88-98-108-120-134-148 sts. When piece measures 20-21-21-20-20-21 cm / 8”-8¼”-8¼”-8”-8”-8¼” inc 1 st each side, repeat the inc on every 3-3-3.5-4-4.5-4.5 cm /
1 1/8”-1 1/8”-1¼”-1½’‘-1¾”-1¾” a total of 5 times = 98-108-118-130-144-158 sts. When piece measures 38-40-41-41-42-44 cm / 15”-15¾”-16 1/8”-16 1/8”-16½”-17¼” bind off 4 sts each side for armhole and bind off for armhole each side on every other row: 4 sts 0-0-0-1-1-2 times, 2 sts 2-3-5-6-8-9 times and 1 st 0-2-2-1-2-2 times = 82-84-86-88-92-94 sts. Continue in stockinette st on all sts. When piece measures 54-57-59-60-62-65 cm / 21¼”-22½”-23¼”-23 5/8”-24 3/8”-25½” bind off the middle 32-34-34-36-38-40 sts for neck and complete each shoulder separately. Bind off 1 st on neckline on every other row 2 times = 23-23-24-24-25-25 sts left on shoulder. Bind off loosely when piece measures 57-60-62-63-65-68 cm / 22½”-23 5/8”-24 3/8”-24¾”-25½”-26¾”.
FRONT PIECE:
Cast on and work like back piece until piece measures 20-21-21-20-20-21 cm / 8”-8¼”-8¼”-8”-8”-8¼”. On next row inc 1 st each side, repeat the inc on every 3-3-3.5-4-4.5-4.5 cm / 1 1/8”-1 1/8”-1¼”-1½”-1¾”-1¾” a total of 5 times = 98-108-118-130-144-158 sts. Continue in stockinette st with 1 edge st each until piece measures 33-34-35-36-39-40 cm / 13”-13 3/8”-13¾”-14¼”-15¼”-15¾”. Now continue as follows (from RS): 1 edge st, 33-38-43-49-56-63 stockinette sts, M.1 (= 30 sts), 33-38-43-49-56-63 stockinette sts and 1 edge st. AT THE SAME TIME when piece measures 38-40-41-41-42-44 cm / 15”-15¾”-16 1/8”-16 1/8”-16½”-17¼” bind off for armhole each side as described for back piece. Continue up to arrow-A in M.1. On next row from RS bind off for neck as follows: work the first 24 sts of M.1, bind off 2 sts (= mid front) and work the remaining 24 sts of M.1 (work remaining sts in stockinette st as before). Insert a marker in piece, and now complete each side separately.
LEFT FRONT PIECE:
Continue back and forth on needle in stockinette st and M.1 as before – remember to bind off for armhole at the side! AT THE SAME TIME on next row from mid front dec 1 st for neck. Continue to arrow-B in diagram for M.1. Now continue with 15 sts rib as shown in M.1, work remaining sts in stockinette st as before. AT THE SAME TIME dec 1 st for neck inside the 15 sts in rib, and repeat the dec on every 4th row 3-4-4-5-6-7 times = 38-38-39-39-40-40 sts.
Continue until piece measures 11-12-12-13-13-14 cm / 4 3/8”-4¾”-4¾”-5 1/8”-5 1/8”-5½” from marker (adjust to length of armhole on back piece). Now bind off 23-23-24-24-25-25 sts from shoulder towards neckline = 15 sts left on needle. Continue back and forth on needle in rib as before on these 15 sts. Bind off loosely with K over K and P over P after approx 7-7-7-8-8-8 cm / 2¾’’-2¾’’-2¾’’-3 1/8’’– 3 1/8’’- 3 1/8’’ (measured from shoulder).
RIGHT FRONT PIECE:
Like left front piece but mirrored.
ASSEMBLY:
Sew shoulder seams.
3/4 SLEEVES:
Worked back and forth on needle.
LEFT SLEEVE:
Cast on 65-65-72-72-72-79 sts on needle size 2.5 mm / US 1 with Alpaca. Work rib as follows (first row = RS): 1 edge st, * P4, K3 *, repeat from *-* on 21-21-28-28-28-28 sts, M.2 (= 18 sts), K3, *P4, K3 *, repeat from *-* on the next 21-21-21-21-21-28 sts and 1 edge st. Continue like this up to Arrow-C in M.2. There are now 73-73-80-80-80-87 sts on needle. Change to needle size 3 mm / US 2or3. Continue as follows (from RS): 1 edge st, 21-21-28-28-28-28 stockinette sts, M.2 (= 26 sts), 24-24-24-24-24-31 stockinette sts and 1 edge st. Work 1 vertical repeat of M.2 like this = 65-65-72-72-72-79 sts on needle. Insert a marker, and now measure piece from here.
Continue in stockinette st with 1 edge st each side. AT THE SAME TIME when piece measures approx 2 cm / 3/4’’ from marker inc 1 st each side, repeat the inc on every 1.5-1-1-0.5-0.5-0.5 cm / 5/8”-3/8”-3/8”-1/4” -1/4” -1/4” a total of 8-11-11-14-17-17 times = 81-87-94-100-106-113 sts. When piece measures 17-16-16-15-14-12 cm / 6¾”-6¼”-6¼”-6”-5½”-4¾” from marker (less for the larger sizes because of longer sleeve cap and wider shoulder) bind off 4 sts each side. Bind off for sleeve cap at the beg of every row: 2 sts 4-5-5-5-4-4 times each side and 1 st 3-3-5-5-11-14 times each side, then 2 sts each side until piece measures 24-24-25-25-26-26 cm / 9½”-9½”-9¾”-9¾”-10¼”-10¼”, now bind off 4 sts each side 1 time, and bind off remaining sts. Piece measures a total of approx 43-43-44-44-45-45 cm / 17”-17”-17¼”-17¼”-17¾”-17¾”.
RIGHT SLEEVE:
Cast on 65-65-72-72-72-79 sts on needle size 2.5 mm / US 1 with Alpaca. Work rib as follows (first row = from RS): 1 edge st, * K3, P4 *, repeat from *-* on 21-21-21-21-21-28 sts, K3, M.2 (= 18 sts), * K3, P4 *, repeat from *-* on the next 21-21-28-28-28-28 sts and 1 edge st. Continue like this up to Arrow-C in M.2. There are now 73-73-80-80-80-87 sts on needle. Change to needle size 3 mm / US 2or3 and continue as follows (from RS): 1 edge st, 24-24-24-24-24-31 stockinette sts, M.2 (= 26 sts), 21-21-28-28-28-28 stockinette sts and 1 edge st. Work 1 vertical repeat of M.2 like this = 65-65-72-72-72-79 sts on needle. Insert a marker, and now measure piece from here. Continue as described for Left Sleeve.
LONG SLEEVES:
Worked back and forth on needle.
LEFT SLEEVE:
Cast on 58-58-65-65-65-72 sts on needle size 2.5 mm / US 1 with Alpaca. Work rib as follows (first row = RS): 1 edge st, * P4, K3 *, repeat from *-* on 21-21-21-21-21-28 sts, M.2 (= 18 sts), K3, * P4, K3 *, repeat from *-* on the next 14-14-21-21-21-21 sts and 1 edge st. Continue like this up to Arrow-C in M.2. There are now 66-66-73-73-73-80 sts on needle. Change to needle size 3 mm / US 2or3 and continue as follows (from RS): 1 edge st, 21-21-21-21-21-28 stockinette sts, M.2 (= 26 sts), 17-17-24-24-24-24 stockinette sts and 1 edge st. Work 1 vertical repeat of M.2 like this = 58-58-65-65-65-72 sts on needle. Insert a marker, and now measure piece from here. Continue in stockinette st with 1 edge st each side. AT THE SAME TIME when piece measures approx 1-2-2-1-1-1 cm / 3/8”-3/4”-3/4”-3/8”-3/8”-3/8” from marker inc 1 st each side, repeat the inc on every 2.5-1.5-1.5-1.5-1-1 cm / 7/8”-½”-½”-½”-3/8”-3/8” a total of 12-15-15-18-21-21 times = 82-88-95-101-107-114 sts. When piece measures 31-31-30-30-28-27 cm / 12¼”-12¼”-11¾”-11¾”-11”-10 5/8” from marker (less for the larger sizes because of longer sleeve cap and wider shoulder) bind off for 4 sts each side for sleeve cap and bind off for sleeve cap at the beg of every row: 2 sts 4-5-5-5-4-4 times each side and 1 st 3-3-5-5-11-14 times each side, then bind off 2 sts each side until piece measures 38-39-39-40-40-41 cm / 15”-15¼”-15¼”-15¾”-15¾”-16 1/8”, now bind off 4 sts each side 1 time, and bind off remaining sts. Piece measures a total of approx 57-58-58-59-59-60 cm / 22½”-22¾”-22¾”-23¼”-23¼”-23 5/8”.
RIGHT SLEEVE:
Cast on 58-58-65-65-65-72 sts on needle size 2.5 mm / US 1 with Alpaca. Work rib as follows (first row = RS): 1 edge st, * K3, P4 *, repeat from *-* on 14-14-21-21-21-21 sts, K3, M.2 (= 18 sts), * K3, P4 *, repeat from *-* on the next 21-21-21-21-21-28 sts and 1 edge st. Continue like this up to Arrow-C in M.2. There are now 66-66-73-73-73-80 sts on needle. Change to needle size 3 mm / US 2or3 and continue as follows (from RS): 1 edge st, 17-17-24-24-24-24 stockinette sts, M.2 (= 26 sts), 21-21-21-21-21-28 stockinette sts and 1 edge st. Work 1 vertical repeat of M.2 like this = 58-58-65-65-65-72 sts on needle. Insert a marker, and now measure piece from here. Continue as described for Left Sleeve.
ASSEMBLY:
Sew shoulder seams. Set in sleeves. Sew sleeve and side seams inside 1 edge st. Sew rib on neck tog mid back and sew to back piece.
 |
= | K from RS, P from WS |
 |
= | P from RS, K from WS |
 |
= | 1 YO between 2 sts, on next row work YO into back of loop to avoid a hole. |
 |
= | slip 1 st on cable needle behind piece, K3, P1 from cable needle. |
 |
= | slip 3 sts on cable needle in front of piece, P1, K3 from cable needle. |
 |
= | slip 3 sts on cable needle in front of piece, K3, K3 from cable needle. |
 |
= | slip 3 sts on cable needle behind piece, K3, K3 from cable needle. |
 |
= | slip 3 sts on cable needle behind piece, work first st on needle tog with first st on cable needle a total of 3 times. |
 |
= | P2 tog |
 |
= | slip 3 sts on cable needle in front of piece, work first st on cable needle tog with first st on needle a total of 3 times. |
 |
= | K2 tog |


Gauge 2.5 st to 1 in
Yarn: Malabrigo Rasta in Soriano and Stitch Red
DPN Size 9
Circumference 22 inches
CO 54 st
I used a two color long tail cast on.
I’m not using the red yarn past the cast on.
Brim: k1p1 for 4 in (10cm)
Hat body (pattern part) is 17 cm, which is 7 in
Circumference of Kittiwake pattern is 56 cm, which is 22 in.
Book: Aran Knitting, Alice Starmore, Kittiwake Hat, page 133 (charts)
Chart A = Hat, 23 st wide, 37 st high
Can accommodate two repeats (46 st)(8 st difference [54-46], so add a 4 st spacer to front of each repeat — so 27 st wide, 54 st with all repeats)
Chart A already has a 6 st p leeway between cables. Adding 4 st would mean making it 8 st on each side. So: (| 3 st of p | 17 st cable | 3 st of p | 3 st of p | 17 st cable | 3 st of p |) becomes: (| 5 st of p | 17 st cable| 5 st of p | 5 st of p | 17 st cable| 5 st of p |) SO there are two sides with a solid 10 st of p — maybe add a nice additional cable twist there to prettify things?
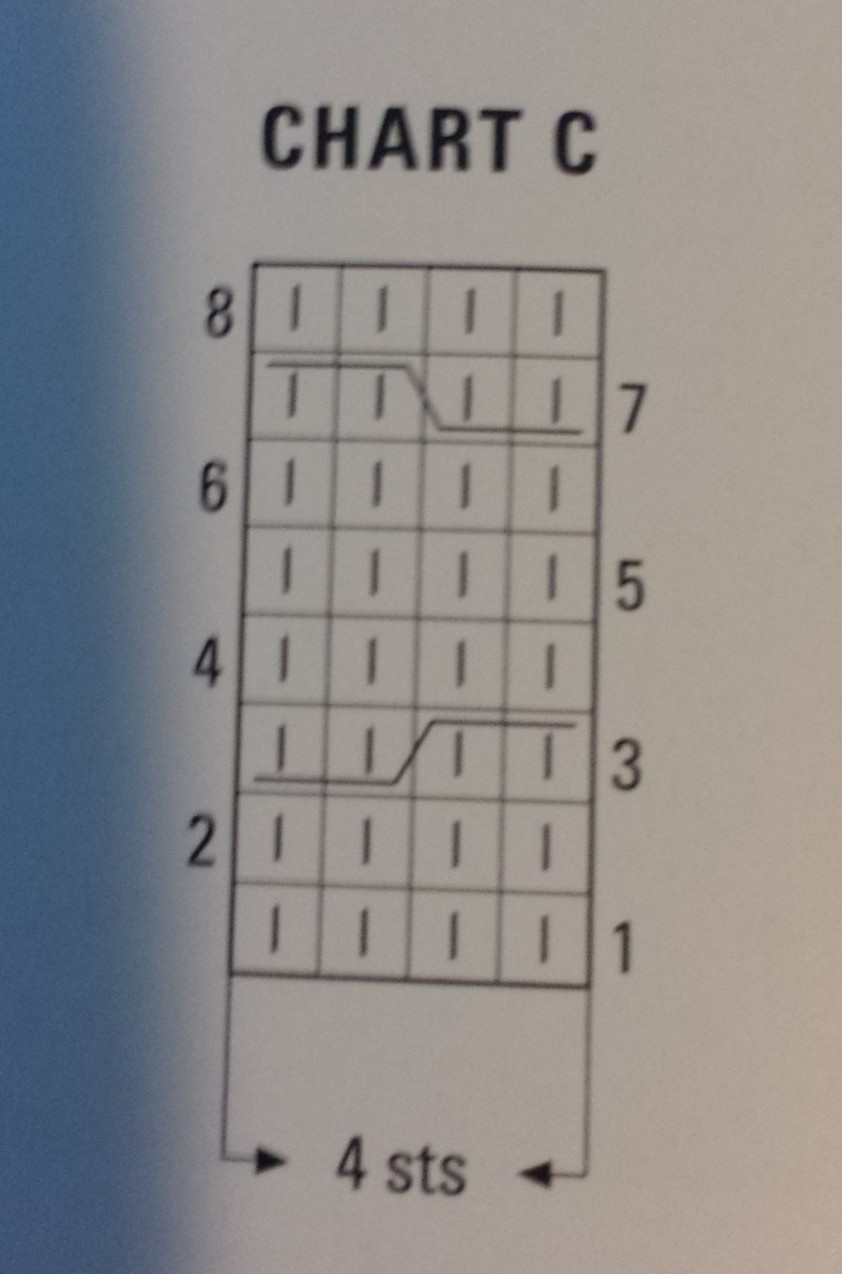
Proposed 4 st repeat, Chart C, 8 st high. Pretty, easy, and symmetrical.
SO design becomes: (| 5 st of p | 17 st cable| 3 st of p | 4 st cable | 3 st of p | 17 st cable| 5 st of p |)
Can make shorter, remember to do a 5 to 1 decrease in center of pattern at top row. This would look best at row 37, 25, 13 and 3.
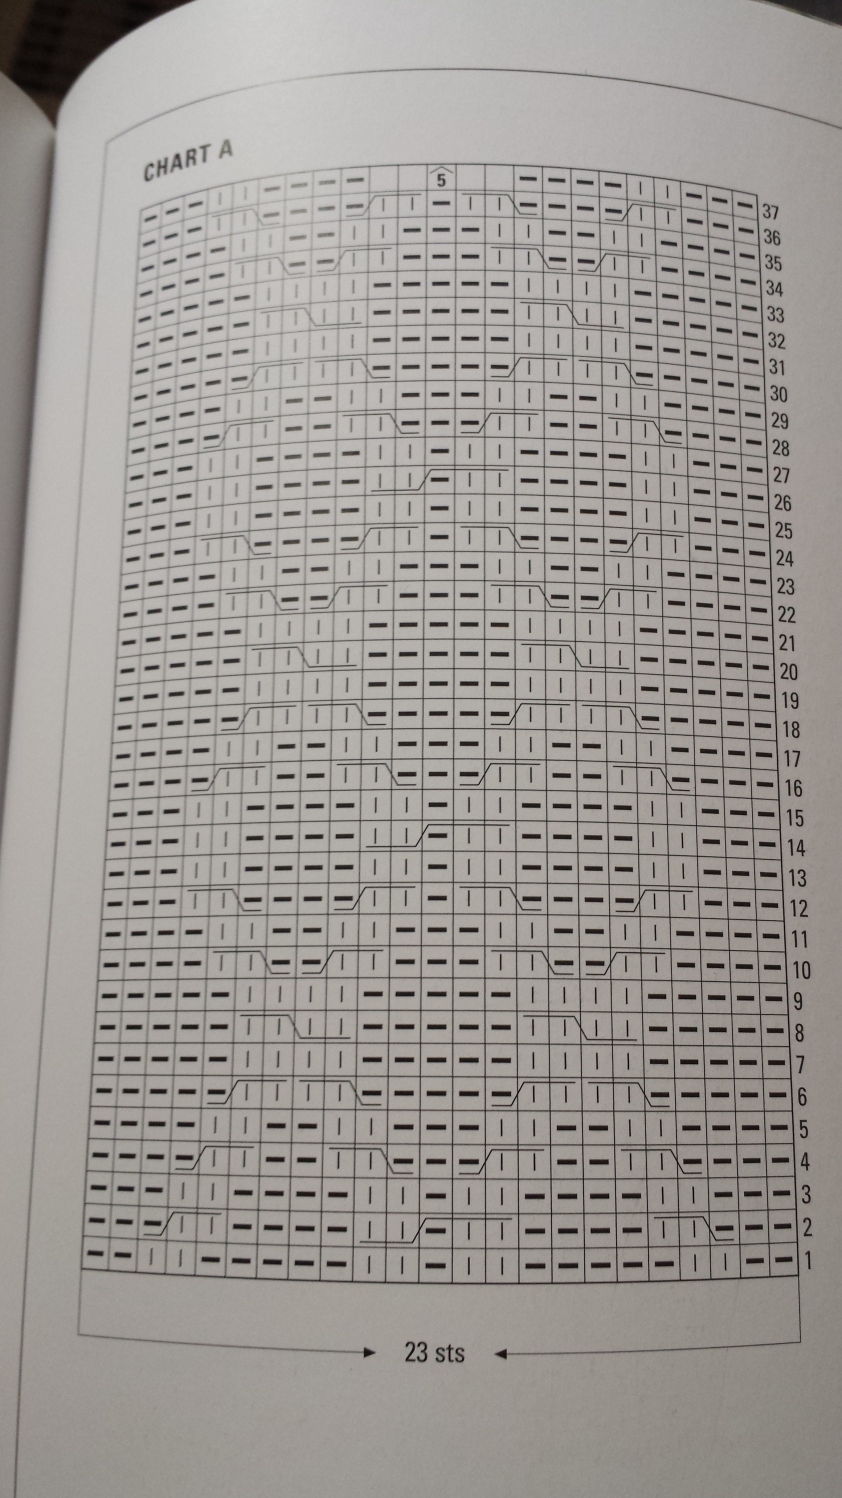
Chart B = Brim decreases, 19 st wide, 24 st high
Decreases are at row 8, 13, 19, and 24. So every 5 rows, two st per repeat disappears. Two repeats, so that is four st. Gauge of 2.5 st to 1 in, that means 1.6 in disappears every five rounds. That actually sounds fine, take a look again when you get there.
After Chart B:
Round 1: p
Round 2: p2tog, p3, p2tog
Round 3: p2tog, p1, p2tog
Break off yarn and put through remaining st on needle. Tighten. Fasten off if you don’t want a pom pom or a tassel.
If you want a pom pom or tassel, refer to the book p. 132.


